Honeywell Thermostat Not Working: Complete Troubleshooting Guide
Honeywell Thermostats are well-known devices to keep your home comfortable. Besides being a source of comfort for houses, it saves energy costs. Therefore, most of the population has a Honeywell Thermostat installed at home.
But as commonly said, an appliance will come with its pros and cons. For example, many people have reported that Honeywell Thermostat is not working correctly. However, these issues are not hazardous and can be handled with easy fixes at home. In this article, we will discuss some of the common issues of a Honeywell Thermostat and easy ways to fix them.
6 Most Common Honeywell Thermostat issues
1. The display is Blank on Your Honeywell Thermostat
This is a standard problem user face when the batteries of the thermostat are old or dead. Besides battery issues, this might also occur if there is a problem with the power source. Sometimes, a panel within the thermostat may shut down and show a blank display for your safety purpose.
2. “Cool On” or “Heat On” is Blinking
When you find these words are blinking, the thermostat is functioning on five minutes delay, i.e., delay mode. The feature generally saves your appliance from damaging short cycling. Unfortunately, this means the thermostat is facing a problem with the heating-cooling system.
3. Honeywell thermostat doesn’t turn on the ac
Any appliance running for a long time will have clogged filters as dust gradually accumulates. The thermostat may not turn on the AC because of clogged filters or faults in the old air filters. As a result, the AC may leak or get overworked.

4. Honeywell thermostat not compatible with your HVAC unit:
An incompatible HVAC unit will cause an expensive breakdown in your device. To determine the compatibility of your thermostat, check which of the three types of system the device belongs to. They are three types: Low-voltage HVAC systems, High-voltage or direct-line HVAC systems, and 24-millivolt HVAC systems. Each requires a different range of volts and must only be set with compatible devices.
5. It Won’t change the temperature.
The utility Company locks the user out of the system if he or she has signed up for a saver switch. If this is not the case, you have to ensure the thermostat has a different temperature (not the same as the room temperature) set in its cooling or heating settings.
6. The Honeywell thermostat won’t turn on
A device program malfunction may stop the thermostat from turning on. A reset in the factory settings is essential to remove any unwanted program or malicious code from your thermostat which may cause an error in its program.
Types of Honeywell Thermostats
It is essential to know the category of your thermostat. There are three kinds of Honeywell Thermostats. Make sure you know them before you start working.
- Non-programmable
- Programmable
- Wi-Fi
7 Most Common Honeywell Thermostat Troubleshooting fixes:
1. Clean or replace the Air Filter
A thermostat might stop working if there is something wrong with its air filter. For example, the air filter sometimes gets clogged and stops circulating correctly through the vents. Therefore, the air conditioner does not function appropriately, resulting fault in the thermostat.
When the air does not circulate properly in the right area, the reading generated in the thermostat may be inappropriate. This can even influence and increase your utility bills when you turn on the thermostat with defects in the air filter.
Air filters must be cleaned or replaced per requirements every few months to a year. It depends on how frequently you use the AC.
For people who are not comfortable cleaning or changing air filters by themselves, professional help is available. You can have professionals visit your home as per a schedule and clean the air filter for the smooth working of the thermostat.
2. Replace the batteries
The most obvious and easy solution is replacing the batteries. Unfortunately, the thermostat stops turning on when the batteries become old, worn out, or dead. Therefore, if your Honeywell thermostat works on batteries, you must replace them with a new set.
Next, detach the thermostat from its faceplate and remove the old batteries.
The batteries may vary from AA to AAA, depending on the model of the thermostat.
Please select suitable batteries of the right size and insert them correctly, aligning with the positive and negative nodes in the battery compartment.
Remember, before replacing the batteries, you must disable the power from the circuit breaker to the thermostat. Put the faceplate back in place and turn on the power button.
The thermostat will take a few seconds, and the screen will turn on.
Next, quickly check if the programmed settings are still in place from the Menu or Program key option.
3. Check the circuit breaker.
Suppose the preliminary solutions are not working for your thermostat. You may have to dig deeper into the issue and look at the circuit breaker.
A circuit breaker issue may interrupt the current flowing to the thermostat. If you see no power flowing to the device, then this is why it is not turning on. To restore power to the thermostat, try flipping the circuit breaker.
After doing this, listen for the click. However, recheck the circuit breaker if the thermostat does not turn on.
In case the power is off, the circuit breaker remains overloaded. So you have to change how the appliances are connected to prevent the circuit breaker from tripping again. Again, an electrician’s help might become necessary in such cases.
4. Check the wiring for any loose connections.
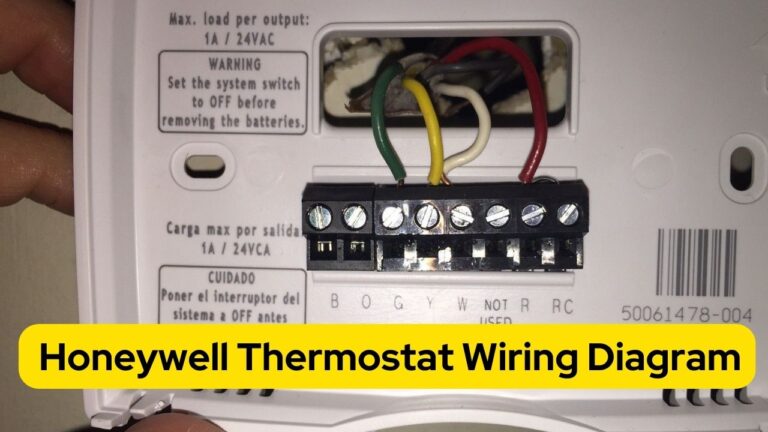
Another common issue that thermostats faces are loose connections. Loose wiring may result in the thermostat not having enough power to function. You can check the wiring of the thermostat by removing its face. This will expose all the internal wires.
Look for the red and white wires and connect them. The appliance should turn on when you join them. If you need more confidence in doing this yourself, then call an electrician for help.
Set the thermostat at the appropriate temperature. The thermostat must turn on when you connect the wires. If it turns on, the issue is not with its wiring connections but how it has been programmed.
If the thermostat is not turning on even after connecting the wires, it has issues with the cables. Handling the main wires can be challenging if you are not used to them. You may have to call a professional for help.
Remember, before you start working with thermostat wirings, you must take all safety precautions. For example, wear safety goggles to protect your eyes in case of any spark. In addition, you can wear gloves to prevent yourself from any current shock.
5. How to fix the blinking “Cool On” Light
Are you facing an issue with the blinking “Cool On” Light? There can be a problem within the system, so you need to test the settings and ensure everything is working. An analogue thermostat can heat, cool, or turn off. In addition, there is a switch to change the fan settings to auto or off. The easiest method to check the thermostat is switching to heat and increasing the temperature. If the heater turns on, then the heating system is working correctly.
Repeat the same step for the air conditioner. Change the mode to “Cool”. Move the fan settings to “Auto” and crank down the temperature. Now, wait an hour to feel the cool air flowing from the vents. If it does, you are lucky.
Check if the device is set to heat when you find the “Heat On” light blinking in the thermostat. In such cases, the device trips a safety timer to protect the compressor of the thermostat. After the light stops blinking, the thermostat returns to keep its heat settings.
If the above method does not work, you have to reset the Honeywell thermostat to fix the heat on blinking. First, turn off the device. Then, turn it back on after 15 to 20 seconds. It can take up to 10 minutes as the device will automatically restart. However, call a professional if the outdoor unit does not start working.
6. Resetting your thermostat
You must reset your thermostat to factory settings if none of the above works. This will eliminate any malfunctioning program and make it run like a fresh new appliance. For battery-powered thermostats, remove the batteries.
Next, insert the batteries in the wrong alignment, i.e., positive to negative and negative to positive. Wait for ten seconds, then put them back in the correct alignment. The thermostat will be reset to factory settings.
Now, program your thermostat to the regular schedule.
If you use the latest version, the Honeywell 8000 series, press the ‘System’ button on the display screen.
Next, hold the ‘blank’ button in the centre of the screen for five seconds.
An option reading ‘Reset to factory settings’ will pop up on the screen.
Select the option to reset your thermostat to factory settings.
Wrapping Up
We have discussed above some of the easy fixes you can try yourself when your Honeywell Thermostat is not working. However, despite trying all the above methods, if your thermostat still does not work, you need to call a professional for help.


