Nest Thermostat Wiring Diagram And Color Codes
The Nest Thermostat is a straightforward device as it acts like an interface via which you control your HVAC.
Integrated with state-of-the-art technology, the Nest Thermostat is continually modifying, learning, and adapting. When you use your Thermostat frequently, it eventually learns when you prefer your house to be warm or chilly. Then it will create a schedule that automatically modifies the temperature to suit your needs.
The device consists of two parts:
The Outer Shell
Made of Aluminium or similar metals. It houses a ring to adjust temperatures, a display to show the room’s exact temperature, pressure, and humidity, and sensors that constantly monitor the temperature, pressure, and humidity levels of a surrounding.
The Inner Layer
It consists of numerous electrical circuits that carry forward data in the form of electric pulses and send them to the base, with innumerable connectors and wires attached to it, which control each dual component of an HVAC.
Nest Thermostat: Wiring Diagram and Color Codes
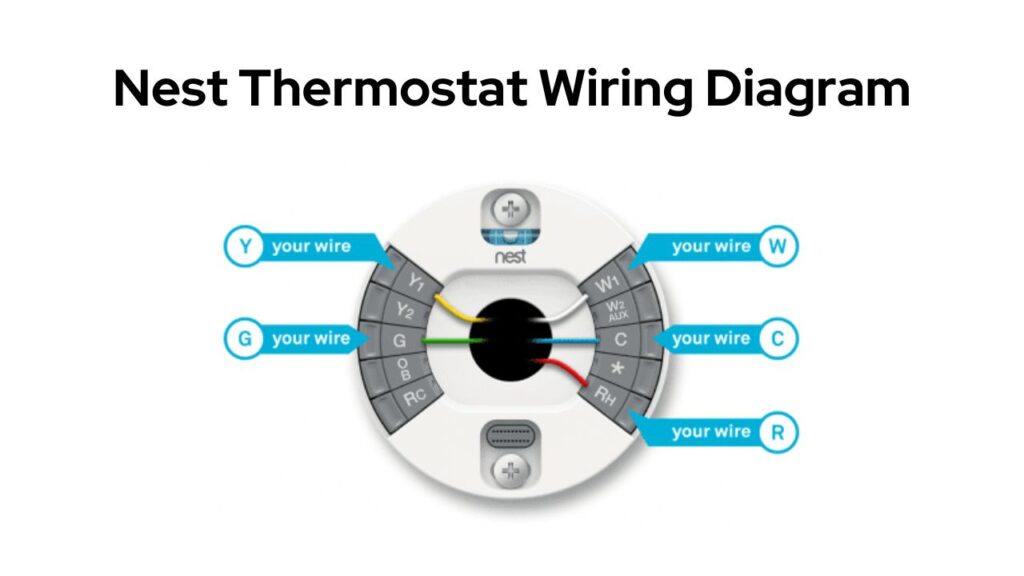
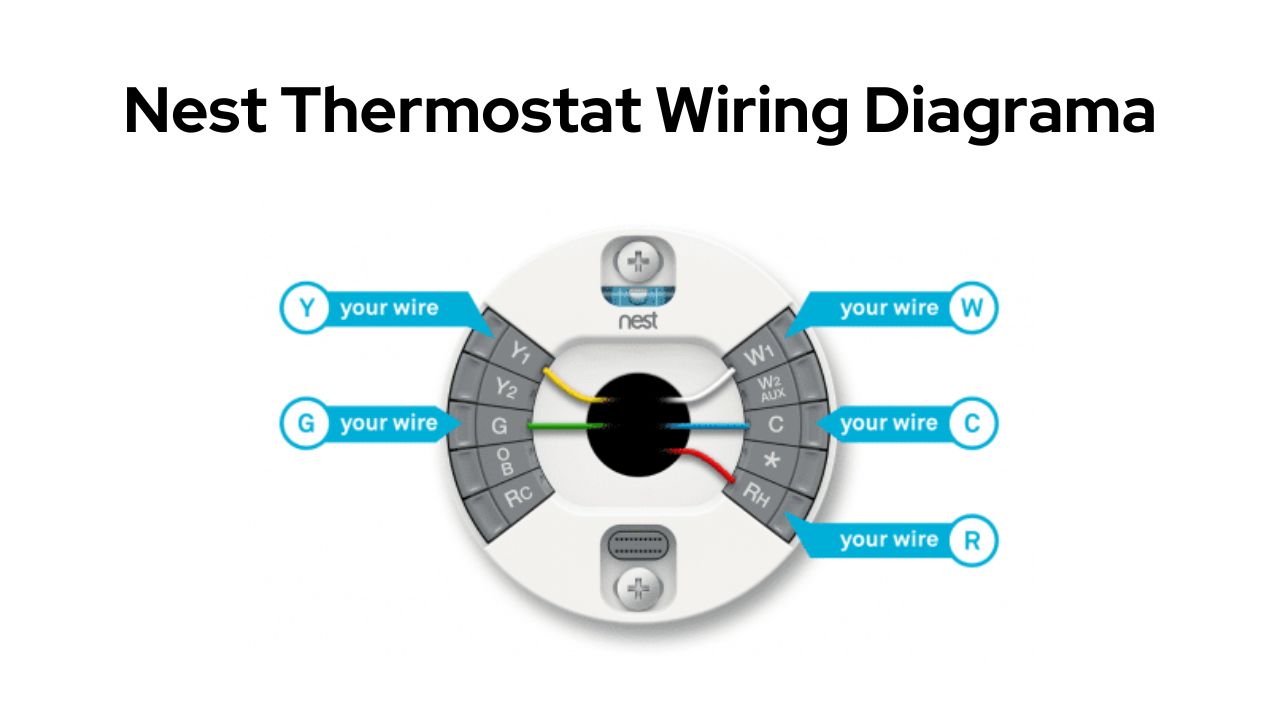
Like a power outlet with live, neutral, and earthing connectors, the Nest Thermostat has 5 different wires that control each small component of an HVAC.

Here’s what Each wire means:
RED – Power Wire – R Wire
As the name suggests, this wire controls the power supply through the Nest Thermostat and transfers it to each heating and cooling component of the setup.
The R-Wire acts like a live terminal directly connected to the AC Power circuit and provides juice to the entire setup.
The R Wire usually goes into the RC or RH terminal of the Thermostat. I prefer the RH terminal because it’s more commonly used and simultaneously helps power both heating and cooling agents.
YELLOW – Cooling Wire – Y Wire
The Y wire controls the Air Conditioning system of the setup. It is directly connected to the centralized air conditioning grid and Compressor, providing cold air through the vents to all rooms.
If your nest thermostat is not cooling properly, there could be an issue with the Y-wire.
WHITE – Heating Wire – W Wire
The W wire controls the system’s boilers, burners, and heaters. It directly powers the furnace or gas outlet, which produces hot air for the HVAC.
GREEN – Fan Wire – G Wire
This wire is responsible for controlling the fans of the setup. The furnace and AC will produce hot and cold air, but the fans push the hot and cold air out of the vents.
The G wire also controls the relay function of the fans. It only turns on the fans without turning on the AC or Furnace to suck in moisture and humidity from a room.
Sometimes the G ire can also be used to cool down rooms during monsoons when there is high humidity, but the temperatures are significantly lower, thus saving you money and time.
BLUE – Common Wire – C Wire
Most Nest Thermostats may or may not have a C Wire depending on the model of the Thermostat. The C Wire acts like a neutral wire that uses direct energy from the AC supply to power up the Thermostat’s battery without turning on any heating, cooling, or fan components.
This wire is necessary because it directly powers up the Nest battery that interacts with the Wifi of your house to regulate and sense temperatures and control the indoor climate automatically.
Since the C Wire is neutral, it is totally up to you whether you want it in your system.
What type of Wiring should I use for my Nest Thermostat?
It depends upon the climate and type of house you have.
If you have a rather large house with multiple rooms with a different climate, get a 5-wire setup.

For most people, the 4-wire setup of R-Y-W-G would be optimal. Whereas, for people who live in places that need just heating, like in the north. You should go for the R-W-G setup.
The R-Y-G setup will be alright if you live in a tropical climate as I do, where you don’t necessarily need heating throughout the year.
Nest Thermostat Compatibility
Before installing a Nest Thermostat in your house, check a few things before installation.
- Most 24 V systems, even older ones, may be used with Google Nest thermostats.
- They are compatible with all commonly used fuels, including electricity, natural gas, and oil.
- Before you install your Nest thermostat, the Google Home or Nest app will walk you through the setup process and let you know if it is compatible with your system.
- You’ll also get a unique wiring diagram for your Thermostat from the app. Strictly follow the chart and refer to the Color codes to set up the wiring.
- Some systems will need the C wire, so check it via the Nest App, available on both Google Play Store and Apple App Store.
- You only need to be aware of the type of heating system to check for compatibility. It makes no difference what brand or model you use.
- Check your manufacturer’s website or get in touch with them if you need clarification on the kind of system you have.
How to install Nest Thermostat with an HVAC?
1. Verify system compatibility
Check all of the wires connected to the existing thermostat against the list of possible connectors on the Nest Thermostat box before opening the package.
Alternatively, use the Compatibility Checker at http://nest.com/works to see exactly where to connect each wire.
2. Check the HVAC system.
Before installing the Nest thermostat, test the heating, cooling, fan, and other system features using the existing thermostat so you can address any existing concerns.
Weather conditions outside occasionally make it impossible to test heating or cooling. In those circumstances, let the client know you can’t test and solicit feedback on the system’s performance.
3. Cut off the HVAC system’s power
To safeguard you and the machinery, turn off the system’s power.
Find the circuit box and look inside to check if the circuits are labelled or if a directory of all the circuits is present. Turn off each circuit for the HVAC system.
4. Remove the old thermostat and cover the holes and serrations on the wall with the old thermostat.
5. Install the device
Utilizing the included screws, fasten the Nest Thermostat to the wall by routing the wires through the middle of the base.
6. Connect the Thermostat to the local Wifi and let the software update to its latest version.
The update can take several minutes, depending on the speed of the internet connection.
7. Pair the Nest Thermostat with the Nest app via a smartphone or Tablet.
8. Check the Cooling and Heating functions of the thermostat to confirm that you have completed the installation.
How to wire a 24v transformer to a Nest Thermostat?
The Nest thermostat is powered by the 24v transformer connected to the R terminal. To wire a 24v transformer:
- First, take the R-wire, also known as the power wire, and slice off the ends of the wire with a razor to expose the bare copper. A small cut of half an inch would do the trick.
- Make sure the HVAC is powered off.
- Take the 24v transformer wire and plug it into the R terminal. Both RC and RH terminals can work. Nowadays, people prefer the RH terminal.
- Screw the wire into the RH terminal with a tester. Don’t use a standard screwdriver. They can act as an inductor and shock you.
- Finally, run the power back on and check whether the thermostat is powering up. If not, you can interchange the RH with the RC terminal.
If it still doesn’t work, then contact customer support immediately.
What’s an HVAC, and how is it better than a standalone AC/ Cooler?
HVAC expands to Heating, Ventilation, and Air conditioning. It’s a specially designed system consisting of fans, coolers, boilers, ventilators, and controls that can power an entire building with one singular arrangement.
HVACs are less of a device and more of a setup that combines numerous components(mentioned above). An HVAC will not only cool down or heat your room, but it will also push out excess moisture and control the climate of the entire room with just a click.
Conventional AC and Coolers are great as standalone devices. But, when you need to power up a large building with more than 10 or 20 rooms, purchasing an AC or Coller for each room becomes expensive. With an HVAC setup, you can vent an entire building for a fraction of the cost.
Did You Know?
HVACs have existed since the early 1990s.
Previously they were only used to control manufacturing and industrial building, but as parts and components became readily available, they tricked down to the Medicare Industry and, finally, commercial households.
By the 1960s, many homes in the USA had ditched ACs and Coolers for HVACs. Every prominent public place, office, and industrial building uses HVACs to minimize cost and increase productivity.
Is HVAC worth it in the long run?
For tiny houses having an HVAC might be overkill, but if you live in an apartment complex or a slightly large house, then HVAC might be a good choice.
Although HVACs are costly to install, they have a longer product life and having a centralized climate-controlling system can spike up the resale value of your property by almost 3 to 5%.


